Creating data components
Administrators can create a component to query specific data from Salesforce orgs (for example, Veeva CRM and Salesforce Service Cloud™) so users can access Salesforce data from Network record profiles. Data stewards can also access the data from data change requests.
View the Creating Data Components video for a walkthrough of how to create data components in Network.
Create a data component
-
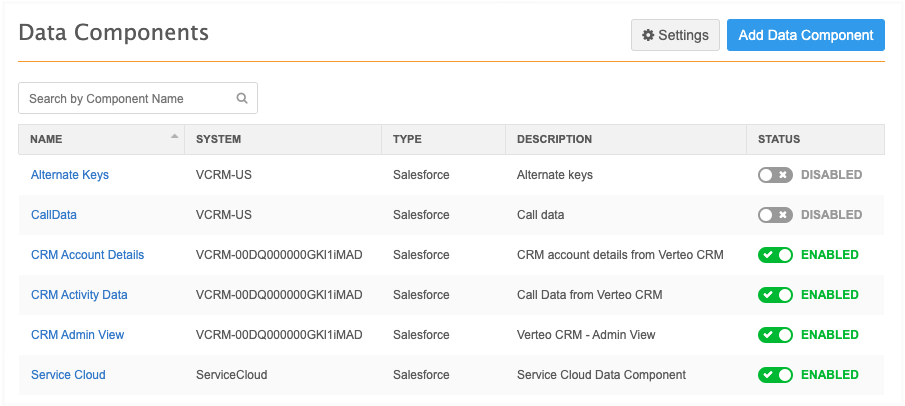
In the Admin console, click Widgets & Portal > Data Components.
-
Click Add Data Component.
-
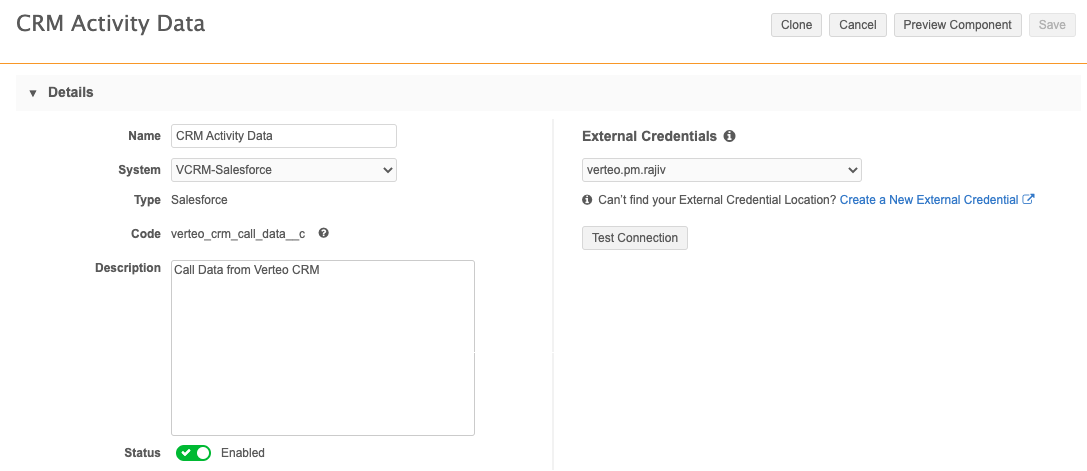
In the Details section, define the following:
-
Name - The unique name that will be used for the component on the profile and data change requests.
-
System - The Network source system.
-
Type - This is read-only. Salesforce is the default type.
-
Description - A meaningful description that is used on the Data Components list page only.
-
Status - The data component is Enabled by default.
-
External Credentials - Expand the list and select the Salesforce org that you want to connect to retrieve the data.
If the Salesforce org isn't listed, click Create a New External Credential to define new credentials for a Salesforce org.
Click Test Connection to ensure that you can connect to the Salesforce org.
-
-
In the Permissions section, specify where the components display, the records that the data component will display on, and the users that will have access to it.
-
Display in - Choose where to display the data component. Each data component can either display on individual record profiles or in the Affiliation widget as tabs that contain data for multiple accounts. The queries used for retrieving and displaying data are different between individual and multiple accounts.
-
Profiles - This setting is selected by default. You can choose to display data components in the Network UI and on Network widget profiles.
-
Network Profile and DCR pages - The component will display in these places in the Network UI.
-
Network Widget Profiles - Display data components for HCP and HCO data on widgets. In the list below, select the widgets that the data component should be applied to. The widgets are grouped by widget type. The list is enabled only when Network Widgets is selected in the Display in setting.
Widgets that are not enabled are dimmed in the list.

-
-
Affiliation Widget Tabs - Display on the tabs in the Affiliation widget. Choose this option if you want to display data for multiple accounts.
If you select this option, at least one widget must be selected.The same Affiliation widget can have data components that display on both profiles and tabs, but the data components must be configured separately. For example, you might have a component for Veeva Engage Meetings that will display when you open an HCP profile in the widget, but you also want a data component to display Veeva CRM calls for all HCPs to display in a tab on the Influence Map.
The results that display for each data component query are based on the following settings:
-
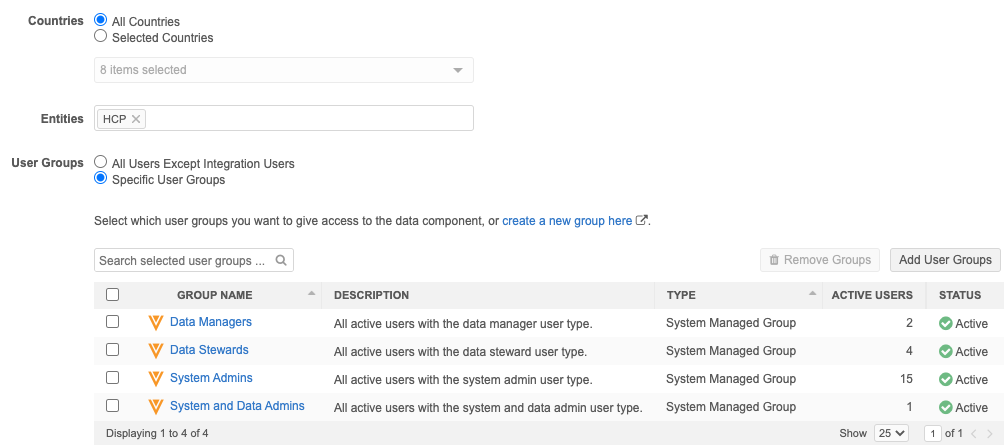
- Country of the record - By default, All Countries is selected. These are all the countries that you have set up in your Network instance. Choose Selected Countries to limit the component to specific countries. For example, you might want this component to apply only to specific countries in Europe.
Expand the list to select the countries. Only the countries that are defined in your Network instance display in the list.
- Entities - By default, HCP is defined. Click the field to add entities. Veeva standard objects and custom objects are supported for the Network UI. Only HCP and HCO data will display for the Network widgets.
-
User Groups - Define the users that can access the data component. By default, All Users Except Integration Users system managed user group is selected. Choose Specific User Groups enable the option to define different groups.
Click Add user groups to data component to choose existing user groups. Click Create a new group here to define a new user group to use for this data component.
-
-
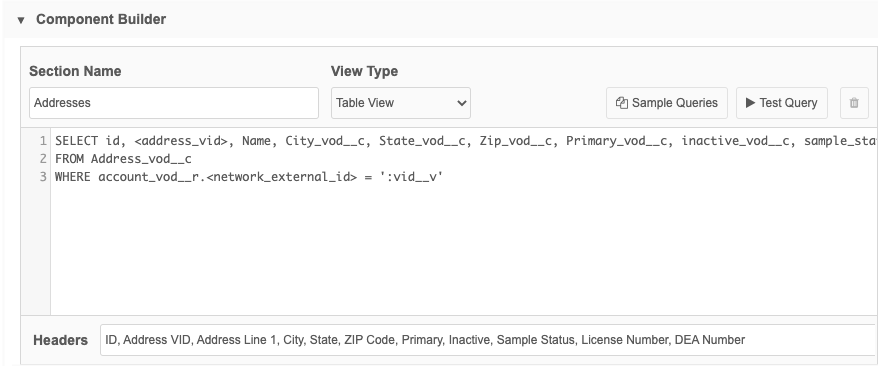
In the Component Builder section, use a SOQL query to retrieve specific data from Salesforce. Write your own query or click Sample Queries to use a predefined query.
Each query that you define in the Component Builder is contained in a Section. When users view data components, the data displays under the section name that you define.
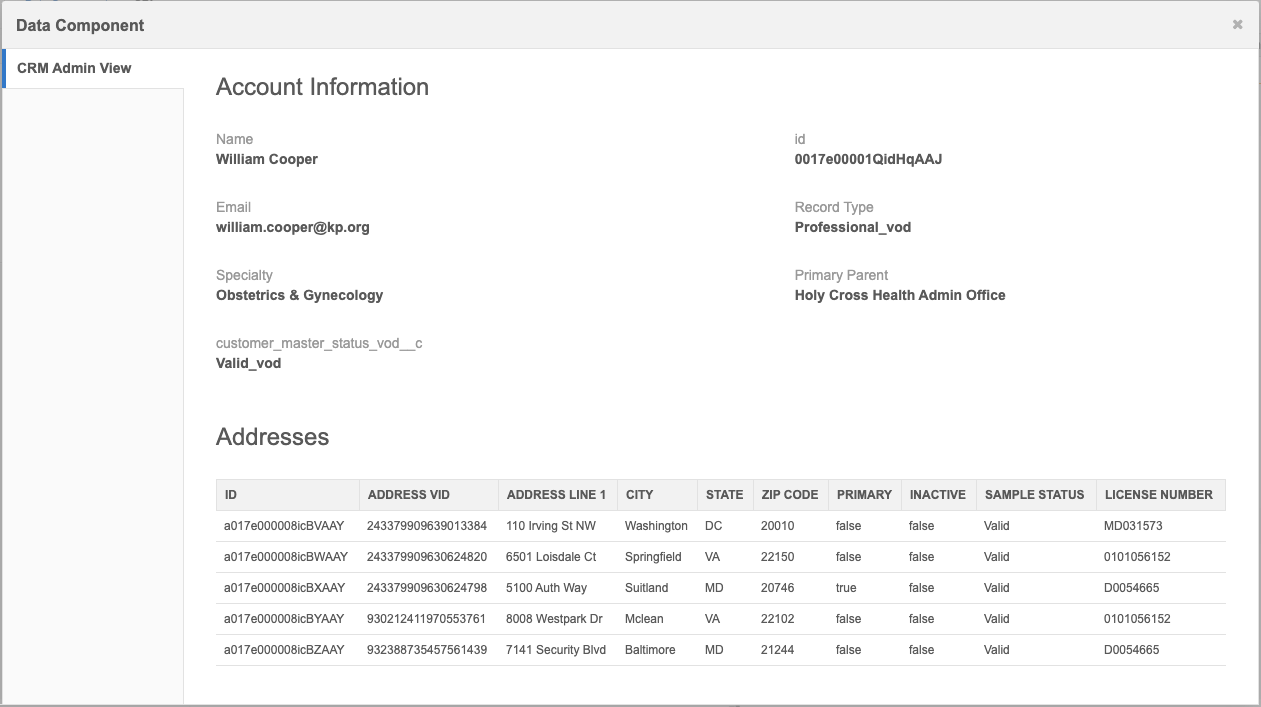
Example section for an individual profile
Use the Addresses sample query so Data Stewards can see address data from Salesforce to help them validate primary address changes in DCRs.
Data components can be created to display data for single accounts or multiple accounts.
-
Single accounts - Display on record profiles in the Network UI and Network widgets, and on DCRs in the Network UI.
-
Multiple accounts - Display as tabs in the Affiliation widget.
The queries for single accounts and multiple accounts use different syntax and variables. See the section below for creating queries for multiple accounts.
To define a query for a single account:
-
In the section, write a query or click Sample Queries to use a predefined query.
Note: There are no sample queries in the list that return multiple accounts (for the Affiliation widget tabs). See the "Sample Queries" section below for queries that you can use.
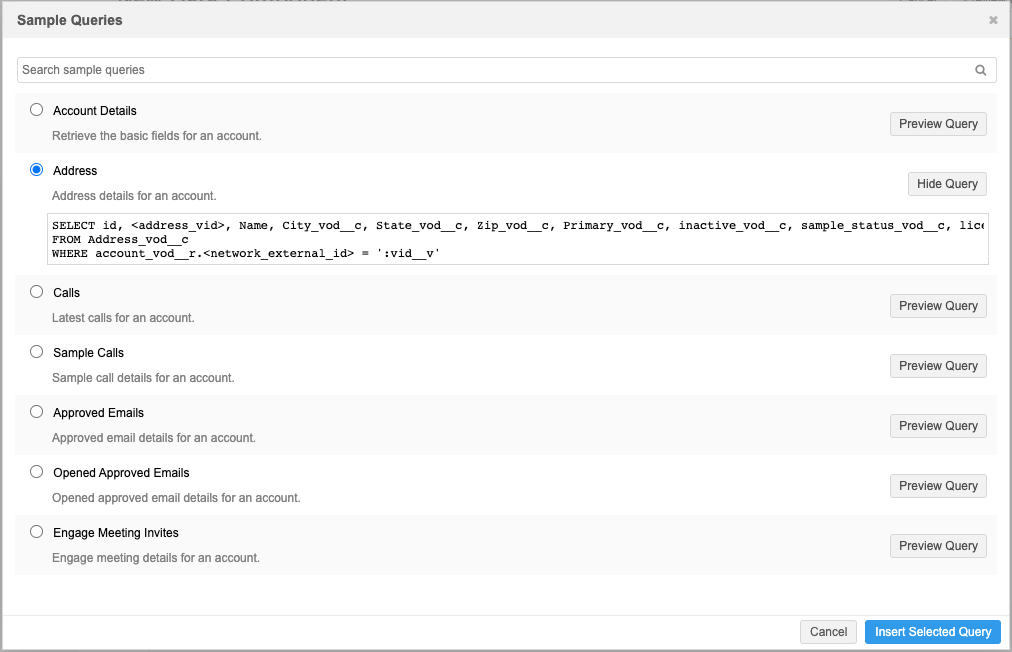
If you click Sample Queries:
-
In the Sample Queries dialog, select a query; for example, the Address query so users can view address details for an account.
-
Click Preview Query to see the fields that are used for the query.
-
Click Insert Selected Query to add it to your section. The query is inserted into the section query box.
About queries
Data component queries use fields from the Veeva CRM object. Some sample queries might have a placeholder for a field enclosed in angle brackets (<>). If the query contains these placeholders, replace it with the appropriate field that you use in CRM. For example, replace <address_vid> with
network_external_id__c.The Network field
vid__vis included in the queries as a dynamic variable. The data component uses this variable to know which data to display when a user clicks the Data Component button on a record profile or data change request. Dynamic variables are in the format ':<field_name>'. Typically, the dynamic variable will be the Veeva ID field,vid__v, but it can be any field depending on the type of data you are querying. -
-
In the Section Name field, type a name for this data; for example, Addresses. This name will be the header in the Data Components dialog that displays the data for users.
-
Choose the View Type. This is the format the data will be presented in the Data Components dialog that users view.
There are two view types:
-
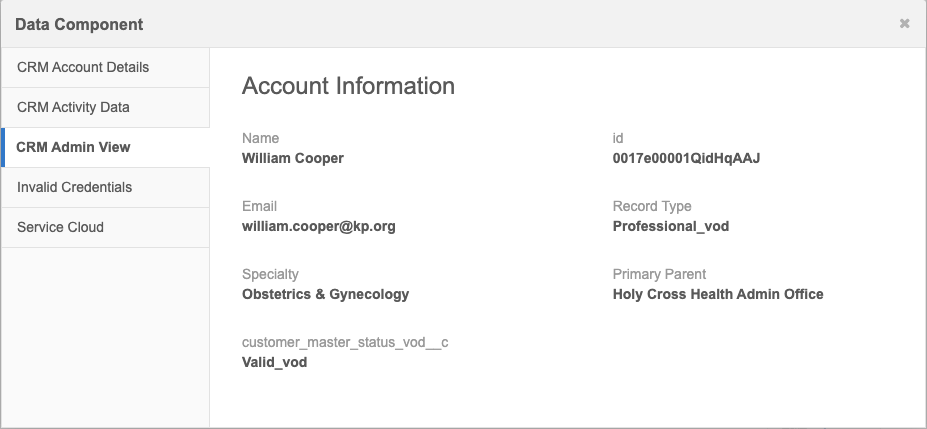
Details View - Use to display a single result; for example, account details.
If you use Detail view and the query returns more than one result, only the first result will display.
Example Details view
-
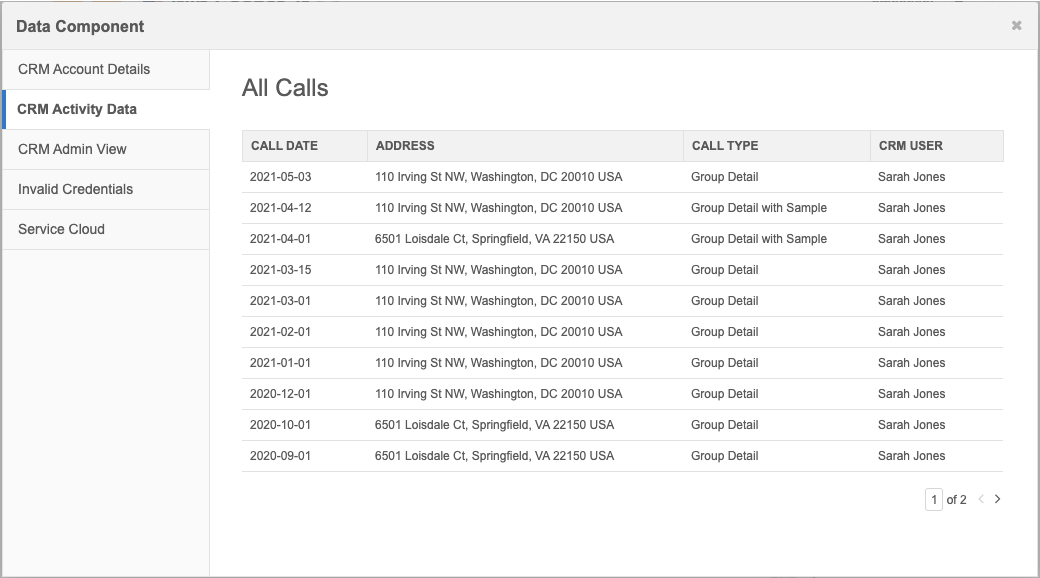
Table View - Use when you expect to return multiple results for an account. For example, address data or call data for an HCP.
Example Table view
-
-
The Headers field contains a comma-separated list of the field names for the data. When you use a sample query, the headers are automatically populated but they can be changed.
If no headers are defined, the column name is returned from the SOQL query.
-
Click Test Query to preview the results to ensure that this is the data you want to retrieve from Salesforce. Testing the query requires a record to retrieve the data. In the dialog, type a Veeva ID from a main entity (for example, HCP or HCO) so you can see the results. The Test Query dialog displays the query and the results.
Note: Your user permissions are used to test the query; not the country and user group permissions defined in the component. For example, if you submit a Veeva ID for a record in Spain but your data visibility profile permissions only include France and Germany, a permission error displays.
You can edit the headers that display. Editing and saving the headers in the Test Query dialog updates the Headers field in the section.
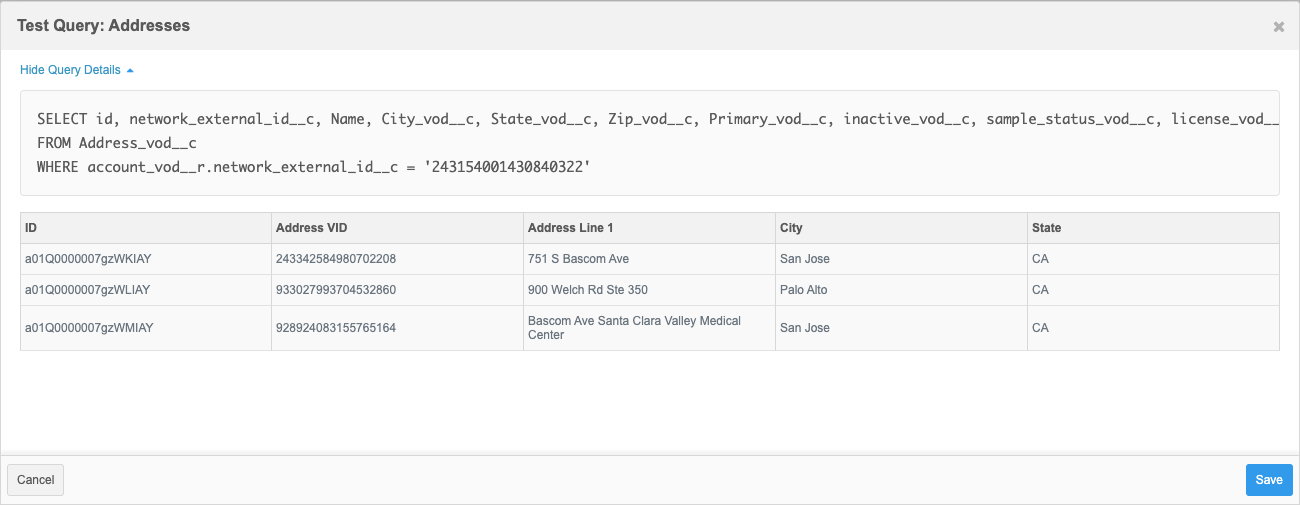
Notice that the Network field that was the variable; for example,
vid__v, is replaced with the Veeva ID that you specified in the Query Details section.Close the dialog to continue.
-
-
To add more sections, click Add Section.
-
In the Reorder Sections pane, all sections that you have defined are listed by section name. Use the Handle
 icon to move a section to reorder where it displays in the Data Component dialog to users. You can also use the Delete
  icon to remove the section from the data component.
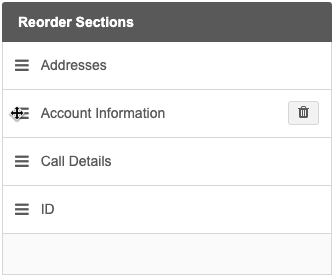
-
Click Preview Component to see how the Data Component will display for Network users. Enter a Veeva ID so you can preview the data for a record.
Note: Your user permissions are used to preview the data component; not the country and user group permissions defined in the component. For example, if you submit a Veeva ID for a record in Spain but your data visibility profile permissions only include France and Germany, a permission error displays.
The preview displays the component, all sections, and any data available for each section.
- Save your changes.
The component will be added to the Data Component page.
Data components can be enabled and disabled on this page. Disabled data components do not display on record profiles and data change requests.
Clone a data component
Use the Clone button to create a copy of the data component. Cloning the component copies most of the configuration except for the data component name or code.
Rename the Data Component button
Administrators can define the languages and labels for the Data Component button.
-
On the Data Components page, click Settings.
-
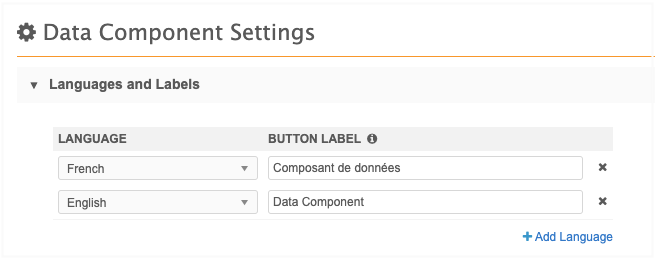
In the Languages and Labels section, click Add Language to define a localized label for the Data Component.
By default, the English label is Data Component, but it can be changed.
-
Save your changes.
The button label will be updated for that language.
Create queries for multiple accounts
When you create a data component, the SOQL query uses a dynamic variable to know which data to display when a user clicks the tab. The syntax and variable are different if you are creating data components for multiple accounts to use in the Affiliation widget.
Multiple accounts
Use the qset variable
When you create a data component for multiple accounts (or sets of data), the set variable uses the IN operator and the following format:
in :qset(<Network field name>)
Note: Single quotes (') and parentheses () are not required in the query with this syntax. Network automatically applies these when the query runs.
Example
If the set variable is :qset(vid__v), Network replaces the variable with a comma separated list of Veeva IDs, in parentheses, when a user clicks the data component tab in the Affiliation widget.
SELECT Call_Date_vod__c, Address_vod__c, Call_Type_vod__c, CreatedBy.Name
FROM Call2_vod__c
WHERE account_vod__r.Network_External_Id__c> in ('243154001456840312', '243187301430840313', '243154001430840322', '243774001430840404', '243154001430842711')
ORDER BY call_date_vod__c desc
The VIDs included in the query are based on the defined permissions for countries and entities.
Use the set variable
You can also use the set variable for multiple account data:
in :set(<Network field name>)
This variable is typically used for a text field. The single quotes (') are not automatically applied when the query runs with this variable syntax. The parentheses are not required in the query; they are automatically applied when the query is run.
Single accounts
Use this variable to return data for a single account. Affiliation widget tabs are intended for data for multiple accounts, so this variable would not typically be used in these SOQL queries.
The single account query can use these operators with the following formats:
Equals (=) operator
= ':<field_name>'
Note that single quotes (') are required around the variable.
IN operator
IN(':<field_name>')
Note that single quotes (') and parentheses () are required around the variable.
Example
If the variable is ':vid__v', Network replaces the variable with the Veeva ID when a user clicks the Data Component button on an account.
SELECT name, id, personemail, recordtype.name, specialty_1_vod__c, primary_parent_vod__r.Name, customer_master_status_vod__c from Account
WHERE Network_External_Id__c = '243154001430840322'
If you use the single variable for Affiliation widget tabs and it's applied to HCOs, the health system VID is used for the query. If you use the single variable and the data component is applied to HCPs only, the Something Went Wrong message displays.
Component builder considerations
When you create a data component for the Affiliation widget tabs, consider the following for the Component Builder section:
-
View Type - The type must be Table View. The Details View applies to components that display single profiles only.
-
Sample Queries - There are no sample queries in the list that return multiple accounts. See the "Sample Queries" section below for queries that you can use.
-
Test Queries - Adding multiple Veeva IDs (VIDs) to the dialog is not supported. The queries must be tested in your Affiliation widget.
-
Preview Component - The preview is not supported for the set variables.
Sample queries for multiple accounts
Use these sample queries to display data for multiple accounts in the Affiliation widget tab data components.
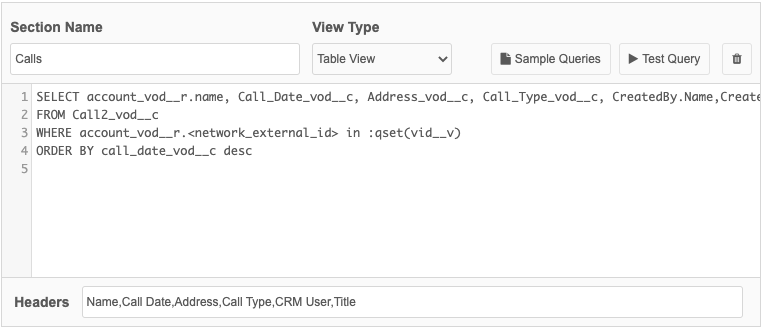
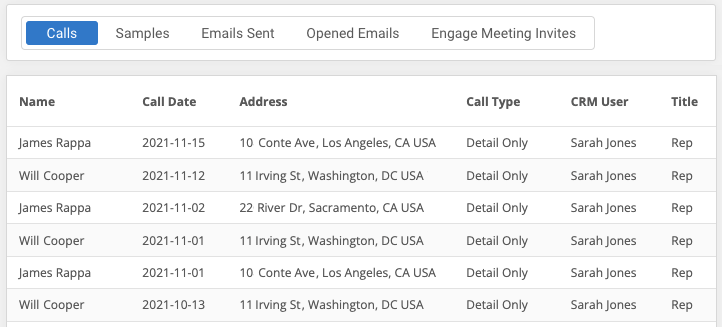
Sample query 1 - Calls
Description: Latest calls for accounts on the Influence Map.
Query
SELECT account_vod__r.name, Call_Date_vod__c, Address_vod__c, Call_Type_vod__c, CreatedBy.Name,CreatedBy.Title
FROM Call2_vod__c
WHERE account_vod__r.<network_external_id> in :qset(vid__v)
ORDER BY call_date_vod__c desc
Headers: Name,Call Date,Address,Call Type,CRM User,Title
Example results
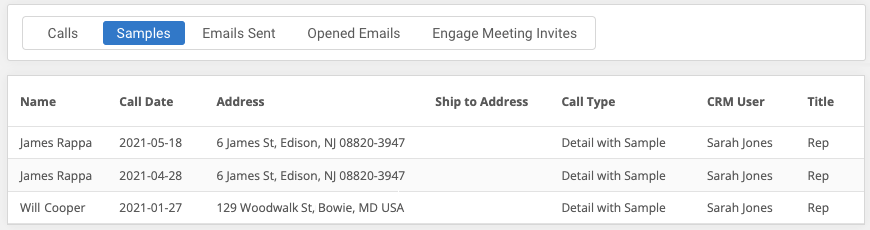
Sample query 2 - Samples
Description: Latest sample calls for accounts on the influence map.
Query
SELECT account_vod__r.name, Call_Date_vod__c, Address_vod__c, Ship_To_Address_Text_vod__c, Call_Type_vod__c, CreatedBy.Name,CreatedBy.Title
FROM Call2_vod__c
WHERE account_vod__r.<network_external_id> in :qset(vid__v)
AND Is_Sampled_Call_vod__c = true
ORDER BY Call_Date_vod__c DESC NULLS LAST
Headers: Name,Call Date,Address,Ship to Address,Call Type,CRM User,Title
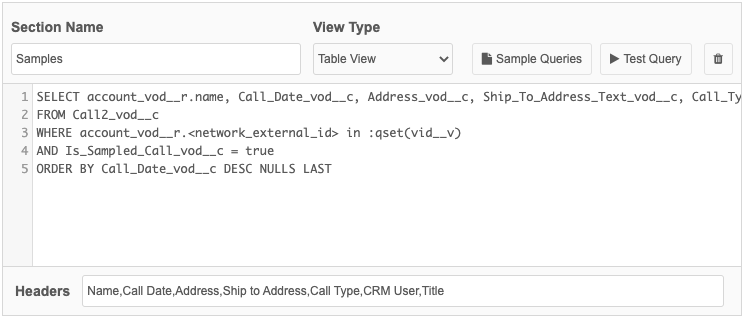
Example results
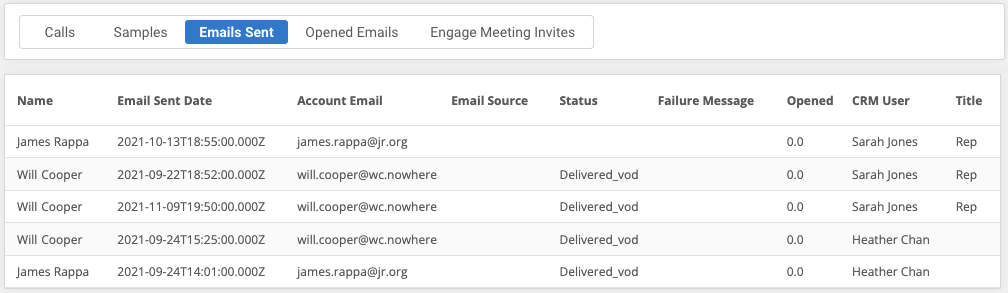
Sample 3 - Emails Sent
Description: Approved email details for accounts on the influence map.
Query
SELECT account_vod__r.name,Email_Sent_Date_vod__c, Account_Email_vod__c, Status_vod__c, Failure_Msg_vod__c, Opened_vod__c, CreatedBy.Name, CreatedBy.Title
FROM Sent_Email_vod__c
WHERE account_vod__r.<network_external_id> in :qset(vid__v)
Headers: Name,Email Sent Date,Account Email,Status,Failure Message,Opened,CRM User,Title
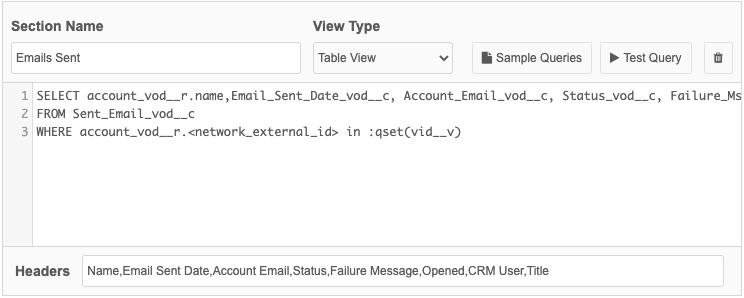
Example results
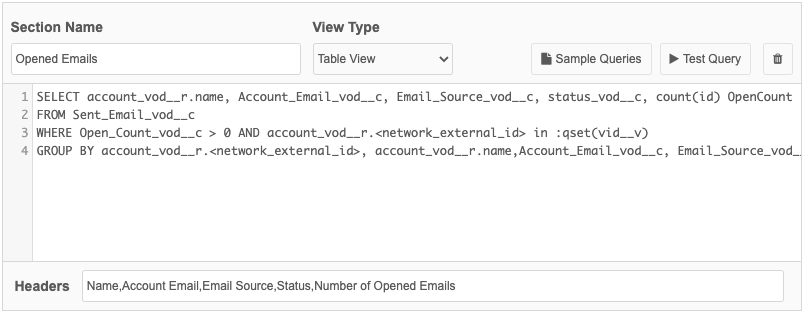
Sample Query 4 - Opened Emails
Description: Opened approved email details for accounts on the influence map.
Query
SELECT account_vod__r.name, Account_Email_vod__c, Email_Source_vod__c, status_vod__c, count(id) OpenCount
FROM Sent_Email_vod__c
WHERE Open_Count_vod__c > 0 AND account_vod__r.<network_external_id> in :qset(vid__v)
GROUP BY account_vod__r.<network_external_id>, account_vod__r.name,Account_Email_vod__c, Email_Source_vod__c, status_vod__c
Headers: Name,Account Email,Email Source,Status,Number of Opened Emails
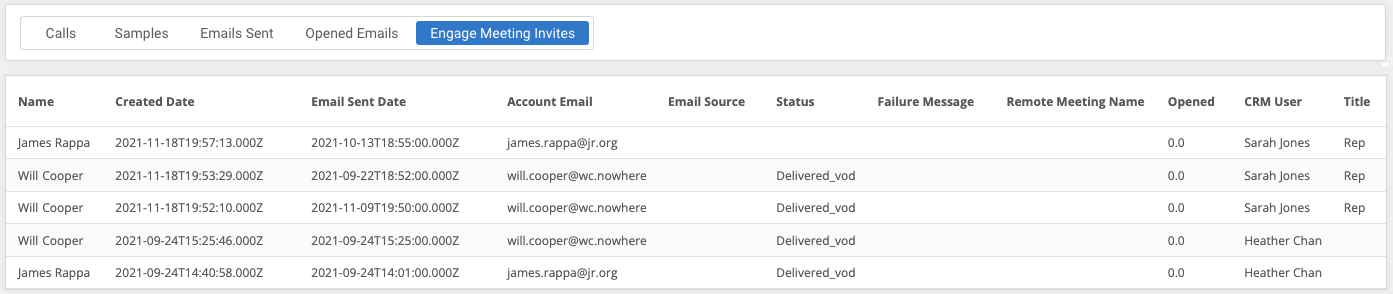
Sample Query 5 - Engage Meeting Invites
Description: Engage meeting invite details for accounts on the influence map.
Query
SELECT account_vod__r.name, CreatedDate, Email_Sent_Date_vod__c, Account_Email_vod__c, Email_Source_vod__c, Status_vod__c, Failure_Msg_vod__c, Call2_vod__r.Remote_Meeting_vod__r.Meeting_Name_vod__c, Opened_vod__c, CreatedBy.Name,CreatedBy.Title
FROM Sent_Email_vod__c
WHERE account_vod__r.<network_external_id> in :qset(vid__v)
Headers: Name,Created Date,Email Sent Date,Account Email,Email Source,Status,Failure Message,Remote Meeting Name,Opened,CRM User,Title

Example results
Logs
Data component changes are tracked in the System Audit History log.
To find log entries, click the Object Types filter and choose DataComponent. Click Get History.